


The Self Portrait Explained
Pencils – I used several graphite pencils ranging from hard & light to soft & dark.
Hard & Light <~~~~ H HB B 2B 4B 6B ~~~~> Soft & Dark
I have used many different brands, but prefer these, which are all good, Derwent, Sanford Design, and Reeves. You will also need a good pencil sharpener.
Paper – Bristol paper that comes in a pad is my favourite, with a smooth finish. I prefer 9” x 12” as the size, but sometimes work on 11” x 14”. The brand I use is Strathmore Bristol 300 Series.
Photograph – You need a photo with a good clear image because you need to intently study the face. Familiarize yourself with the small details of each and every feature. This knowledge will later help you achieve the realism in your drawing. I use a magnifying glass with a light, which attaches to my drawing table, to study the fine detail. The photo for this drawing was 4” x 6” and in color.
Accessories – I like to use small and large blending stumps and tortillions. The tortillions are spiral-wound cones of paper. The stumps are harder, pencil- shaped and pointed at both ends. Kneaded erasers are a must-have for pencil drawings. They can be molded to a certain shape and used to gently “lift” highlights without ruining the surface of the paper. An ordinary sheet of paper comes in handy to lay over the portion of your work that is already done so you don’t smudge it with your hand.
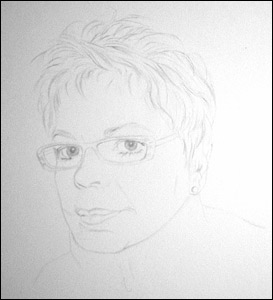
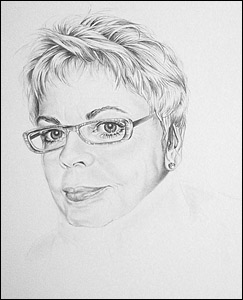
Step 1
Start by deciding how much of your subject you want to draw…than figure out the best placement of that subject on your paper. Using an H pencil, slightly sketch and lay in the shapes of your portrait. Keep it light, so if you need to erase, it won’t damage the paper. This will be your accurate line drawing, but remember to use soft lines. The overuse of hard lines creates a harsh outlined look, which you don’t want.
Getting your proportions accurate will be hard to start, but don’t despair, it will come with time and lots of practice. If you’re a beginner, you could use a grid and divide the photo you are working from, into smaller quadrants and then transfer the data from each quadrant to your art paper. Eventually, the grid lines will become imaginary as you become more familiar with the proportions and more confident with your drawing.
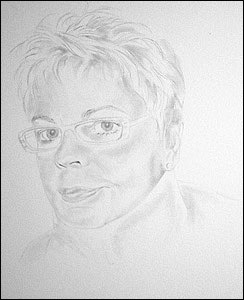
Step 2
Start your preliminary shading with a well-used stump that has lots of graphite on it from previous drawings. You will see the lines from Step 1 will start to disappear and the blending will start to define the contours of the face and hair. You can see the tone creating shapes that now have some depth, and the drawing no longer looks flat.
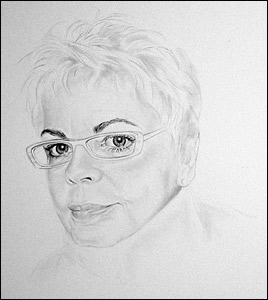
Step 3
Focusing, now, on the nose, eyes, and mouth. This is where studying the fine detail in that photograph comes to play. It is this area that determines the accuracy of the proportions ultimately affecting the likeness of the person you are drawing. The nose connects everything together on the face. See how, at this stage, it softly blends over into the cheeks, up to the forehead, and down to the mouth. Using a HB pencil, darken the area on the bridge of the nose. Look for the areas where the light hits the side and tip of the nose and using your kneaded eraser, gently lift off the graphite to create the highlights. Using a B pencil, darken the nostril area to show depth. Moving up to the eyes, you will need to use several of your pencils from the very light (H) around the lower eyelid, to your very darkest (6B) for the pupil. Smooth blending with the small tortillion, around the eye, and on the eyeball is crucial in making the drawing look realistic. Study the iris with your magnifying glass. This is where the individual and unique characteristic of that person you are drawing will show through. Lightly place in the eyelashes, as clumps and not single hairs. With the eyebrows you will need to build up layers of hairs overlapping one another until you get the volume and tone you need. The biggest mistake in drawing the mouth is making the outline too harsh and continuous, which makes it appear flat and unreal. Just keep the shapes tones and blended with a darker segment of line in the corners to show depth.
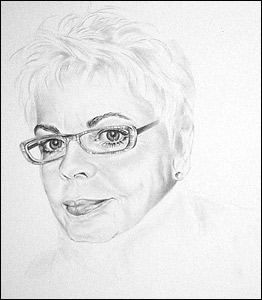
Step 4
In this step, you are going to go over everything again to refine and darken the face portion of the drawing using your HB and 2B pencils. You can see it has a much more finished look and the realism has come to play. Accent the strong blacks with your 4B and 6B. Once you are happy with the face area, start to detail the eyeglasses, if your subject is wearing them. Again, be careful not to end up outlining everything. In some areas, such as the corner, you may use a segment of a line, and then in other areas, make the lines subtle, fading in and out. Do the same with the pattern and the color on the glasses. Notice how dark the arm is where it attaches to the glasses and then fades out at the hairline.
Step 5
In Step 5 we are working on the ear and hair. Again you need to really study the photo to see all the interlocking shapes and variety of tones that make up the ear. Blend your tones from dark to light. Pull out your highlights with the kneaded eraser. Wrinkles, lines, and creases make the ear more realistic and personal, so be sure to add them in.
I now love drawing hair. There was a time when I didn’t…. I just couldn’t get it! I expressed my frustration to Lynn Johnston, whom is mentioned in my biography. She told me to “draw hair as you would comb it…. in sections, and layer by layer”. It’s taken me many years of practice, but I think I’ve got it. I now can’t wait to “do the hair” and I tell my hairdresser, Dawn, to “check out the hair”.
In this portrait, keep in mind that the hair is grey, so start off with the H pencil, and then with HB, section off the hair and slowly build up the details in layers. Apply the dark areas, blend, and apply again. Lift highlighted areas, which there are many, with your eraser. A few loose strands of hair here and there make the portrait less perfect and more realistic.
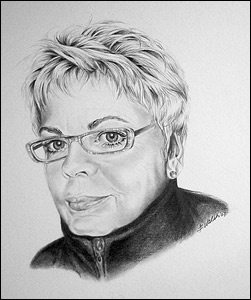
Step 6
With 2B and 4B pencils emphasis some of the darkened areas of the hair to show depth and volume. Satisfied with the completion of the face and hair, move on to the neck and shoulders. In this case, we are looking at a black fleece jacket with a high collar. Using your darker B pencils, 4B and 6B, layer your tones and blend with the larger stump. Lift the highlighted areas with the eraser and along the bottom edge to create softness and show where you are ending the drawing. Sometimes you need to step away and leave the drawing for a while…. look at it again, and you may see something that needs adjustment or refining, whether it is to darken or lighten an area…. give yourself time and don’t rush.
When you are completely happy with the finished drawing, sign your name, and be proud of what you have accomplished.
All works are copyright by the artist and may not be reproduced by any means without prior written consent by Frances Walsh. Website design by Ian Granberg.